
Film lighting is the process of choosing where light comes from, how strong or soft it is, and what it reveals or conceals in a scene. A useful setup begins with a question: What should the audience notice or feel in this shot? The answer may call for a bright, open image, a face partly in shadow, or a practical lamp that appears to illuminate the room. None requires a fixed number of lights.
If you're learning, start with the light you already have. A window, a reflector and a camera can teach you more about direction and contrast than a complicated rig you don't know how to control. Once you can describe what a light is doing, you can make deliberate changes instead of moving fixtures at random.
What should you decide before placing a light?
Identify the subject, the emotional goal and the constraints. Where is the subject moving? Which part of the face or environment matters most? What light already exists? Can you control it? How much room is available? Is the background meant to be visible or disappear into shadow?
Consider a short dialogue scene at a kitchen table. If the story calls for a relaxed afternoon, you might use the window as the key light and bounce some of it back into the shadow side. For a tense conversation, you might keep the window but remove the bounce and use negative fill to deepen the shadow. The equipment barely changes; the decision does.
A key light is the dominant source shaping the subject. Fill reduces contrast in areas the key doesn't illuminate. A backlight or rim light can separate the subject from the background, but separation can also come from colour, exposure, composition or the background itself. These are functions, not mandatory fixtures.
One light, two lights or three-point lighting?
| Setup | Good starting situation | What to watch |
|---|---|---|
| One source, such as a window or soft lamp | A simple portrait, limited space or a naturally motivated scene | Shadow depth, background spill and whether the subject can move without leaving the light |
| Key plus bounce or negative fill | You want to adjust contrast without adding another powered light | Whether fill flattens the image or negative fill hides important detail |
| Key, fill and backlight | You need more independent control over the face and subject/background separation | Extra stands, reflections, unwanted shadows, room constraints and continuity |
Three-point lighting is a useful framework, not a rule for every film scene. A scene may need one source, several sources or none added beyond the available environment. Start with the simplest arrangement that achieves the intended image, then add control only where it solves a specific problem.
How do you position key, fill and backlight?
Place the key where it creates the direction and shadow shape you want. Check the subject's eyes, nose shadow and the falloff across the face. If the dark side loses too much important detail, try a reflector or a controlled fill. If the face looks flat, reduce fill or use negative fill—dark material placed outside the frame to limit bounced light. A backlight may help outline the subject, but make sure it doesn't create distracting glare or a conspicuous halo.
How do hard and soft light change the image?
Hard light creates more defined shadow edges; soft light produces more gradual transitions. Apparent source size relative to the subject is a major factor. A large nearby diffused source generally produces softer facial shadows than a small bare source at a similar position. Moving the light also changes falloff, reflections and how much of the background receives light.
Try this before buying additional equipment: keep the subject and camera in place, take one frame with a small undiffused source and another with a properly supported diffusion source. Compare the shadow edge on the face and the background. Do not assume softer is automatically better; crisp shadows can be exactly what a scene needs.
Bounce can redirect light from a wall or reflector. A flag blocks unwanted light; negative fill reduces ambient bounce. These controls can be especially useful in small rooms where adding a second fixture may make the whole image brighter without improving its shape.
Practical, motivated and natural lighting
A practical light is a visible source within the scene, such as a desk lamp. Motivated lighting makes a source feel believable in the story world, even if an off-camera fixture actually provides most of the illumination. A lamp visible in a night interior may motivate a larger, softer source placed outside the frame. The audience perceives a coherent direction of light rather than the equipment behind it.
Natural light is useful but changes with time, weather and the direction of the window. If a scene must be filmed over several hours, record the time of day, exposure and white-balance settings, and photograph the setup before moving anything. Watch where sunlight falls on the background as well as on the actors.
What should you do with mixed colour temperatures?
Daylight and tungsten-style sources can appear different in colour. You have two legitimate choices: bring them closer together for a more neutral look, or preserve the difference because it supports the scene. Before changing settings, decide which source should look neutral and which may retain a colour cast. White balance affects the entire image; adjusting it does not independently correct every source.
Take a reference frame and review it on a suitable monitor. Avoid treating a single Kelvin number as universally correct: the sources, camera settings, desired look and display conditions all matter.
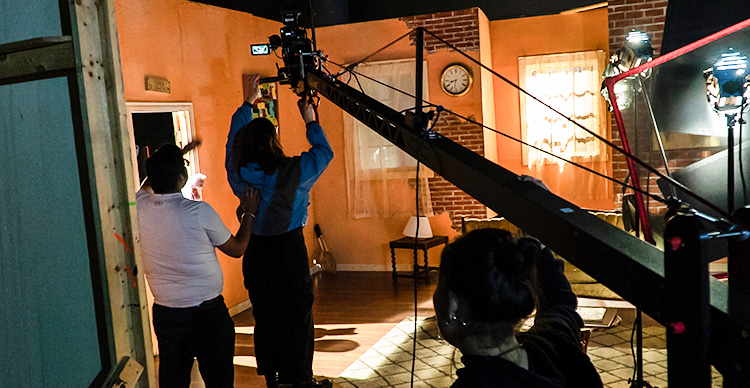 VFS Film Production students have access to state-of-the-art industry equipment during their 1-year program.
Example: lighting an interview in a small room
Imagine an interview subject sitting near a bright wall. A soft key gives a pleasant face but also illuminates the wall, making the image look flat. Before adding another light, try changing the subject's distance from the wall, adjusting the key's direction and using a flag or negative fill where safely possible. If the room has a window, evaluate whether it can become the key rather than competing with it.
Make one change at a time. Compare the subject's face, the wall brightness and the separation between them. This is an illustrative scenario, not a documented VFS student experiment.
Safety note: Lighting stands, suspended fixtures, cables, electricity and heat introduce risks. Use equipment according to manufacturer instructions and venue requirements. Qualified crew should handle overhead rigging, electrical distribution and any setup beyond your training. A home exercise should rely on stable, safely positioned equipment.
Try it: one scene, three lighting setups
Choose a stationary subject and a simple background. With permission, record a short clip or take still frames from the same camera position. Keep the framing and key camera settings consistent where practical, and note any settings you must change.
- Setup A — One source: Use a window or a safely placed light. Record where the shadow falls and what happens to the background.
- Setup B — Change the contrast: Add a reflector or remove bounce with negative fill. Record which details become easier or harder to see.
- Setup C — Add separation only if needed: Introduce a suitable background or rim source, or change the subject/background relationship. Explain why the change helps the story.
For each setup, complete this short observation record:
| Question | Add your notes here |
|---|---|
| What should the audience notice or feel? | |
| What is the key source and where is it? | |
| What changed from the previous setup? | |
| What happened to the face and background? | |
| What would you change next, and why? |
The goal is not to prove that the three-light version is best. It is to understand how each deliberate choice changes what the viewer sees.
Troubleshooting common lighting problems
| What you notice | Possible cause | First adjustment to test |
|---|---|---|
| The face looks flat | Too much frontal or bounced fill | Shift the key or reduce fill/ambient bounce |
| Shadows look harsher than intended | Small apparent source or unfavourable direction | Test a larger diffused source or reposition the key |
| The background is too bright | Spill or subject too close to the wall | Change position, direction or flag spill safely |
| A visible lamp looks disconnected from the scene | Off-camera illumination doesn't match its apparent direction | Reconsider source direction and motivation |
| Colour shifts between shots | Mixed sources, automatic white balance or changing daylight | Set and document a deliberate white-balance approach; take reference frames |
| A scene changes over time | Moving daylight or altered fixture positions | Keep a continuity log and photograph the setup |
These are diagnostic starting points, not universal fixes. Review each adjustment against the scene's intended look.
What about lighting in 3D animation?
Film and 3D animation share visual questions about direction, contrast, colour and mood. But digital lighting also depends on the renderer, materials, simulated light transport and, in real-time environments, performance constraints. A physical lighting exercise can improve your eye for composition and shadow, but it is not a substitute for a dedicated CG-lighting workflow. The VFS 3D Animation & VFX program is a separate educational pathway.
How can you develop these skills further?
Practise by recreating a simple mood with fewer tools, then compare your results and explain your decisions. On a production, the cinematographer and lighting team collaborate on the visual approach, while specific responsibilities vary by crew size and production. If you're exploring structured training, consult the current VFS Film Production curriculum for its cinematography coursework. A course description is not a guarantee of a particular job or outcome.
FAQs
Do I need three lights to make a scene look cinematic?
No. Three-point lighting teaches useful functions, but the scene may work better with a window, one fixture or an intentionally dark environment. Judge the setup by what the audience needs to see and feel.
What's the difference between key light and fill light?
The key shapes the main direction and shadow pattern. Fill reduces contrast in areas the key doesn't illuminate. Fill can come from another lamp, a reflector or ambient light.
How can I practise film lighting without expensive gear?
Use available daylight, a stable camera position and a reflector or safe household materials to study bounce and negative fill. Avoid improvised electrical or overhead rigging. Document one change at a time.
Should I always make shadows softer?
No. Softness is a storytelling choice. Defined shadows can create shape or tension; softer transitions can suit other moods. Compare both with the same subject before deciding.